To change the nameservers for a domain registered with GoDaddy to custom nameservers, you’ll need to follow these steps:
1. Log in to your GoDaddy account: Visit GoDaddy’s website and log in using your account credentials.
2. Access Your Domains: Once logged in, go to the “My Products” section. From there, select “Domains” to view a list of all the domains you have registered with GoDaddy.
3. Select the Domain: Find the domain for which you want to change the nameservers and click on it to access its management page.
4. Access Nameservers Settings: On the domain management page, look for the option to manage nameservers. This option might be labeled as “Manage DNS,” “Nameservers,” or something similar.
5. Choose Custom Nameservers: In the nameservers settings, you’ll typically find options like “Default,” “Custom,” or “Use other nameservers.” Choose the option for custom nameservers.
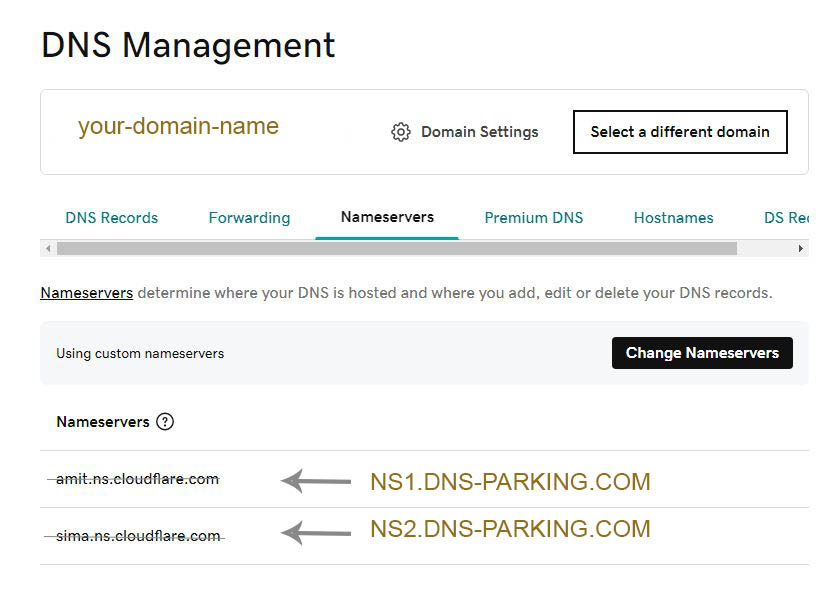
6. Enter Custom Nameservers: Once you’ve selected the option for custom nameservers, you’ll see fields where you can input the custom nameserver information. Enter the nameservers provided by your hosting provider or DNS service. Usually, you’ll need to input at least two nameservers, and they should be in the format of domain names (e.g., NS1.DNS-PARKING.COM, NS2.DNS-PARKING.COM).
7. Save Changes: After entering the custom nameservers, make sure to save your changes. There should be a “Save” or “Update” button on the page. Click on it to save your new nameserver settings.
8. Verify Changes: After saving the changes, it may take some time for the changes to propagate across the internet. You can use online DNS lookup tools to verify that the nameservers have been updated successfully. These tools allow you to query the DNS records for your domain and see which nameservers are currently configured.
9. Confirmation: Once the changes have propagated, you should receive a confirmation email from GoDaddy confirming that the nameserver update is complete.
It’s important to note that DNS changes, including nameserver updates, can take up to 48 hours to fully propagate worldwide. During this time, some users may still be directed to the old nameservers. Additionally, ensure that the custom nameservers you are using are correctly configured and operational to avoid any disruptions in your website’s availability.